Not All Foundation Repairs Are Created Equal
When a structural engineer or contractor tells you your foundation needs work, the next question is obvious: what kind of work? Foundation repair is not a single procedure. It is a category that spans seven distinct methods, each designed for a specific type of damage, soil condition, and budget.
Choosing the wrong method can cost you thousands in unnecessary expenses or, worse, fail to solve the underlying problem. A homeowner in Dallas dealing with a settling slab on expansive clay soil needs a fundamentally different solution than a homeowner in Michigan with a bowing basement wall.
This guide breaks down all seven methods: how they work, what they cost, how long they last, and which problems they actually fix. By the end, you will know exactly which option fits your situation -- and which ones to avoid.
The "best" foundation repair method does not exist in isolation. The right choice depends on three factors: (1) the type of damage you have, (2) the soil conditions under your home, and (3) the structural load your foundation carries. A qualified inspector should always confirm the diagnosis before any work begins.
Steel Push Piers Premium
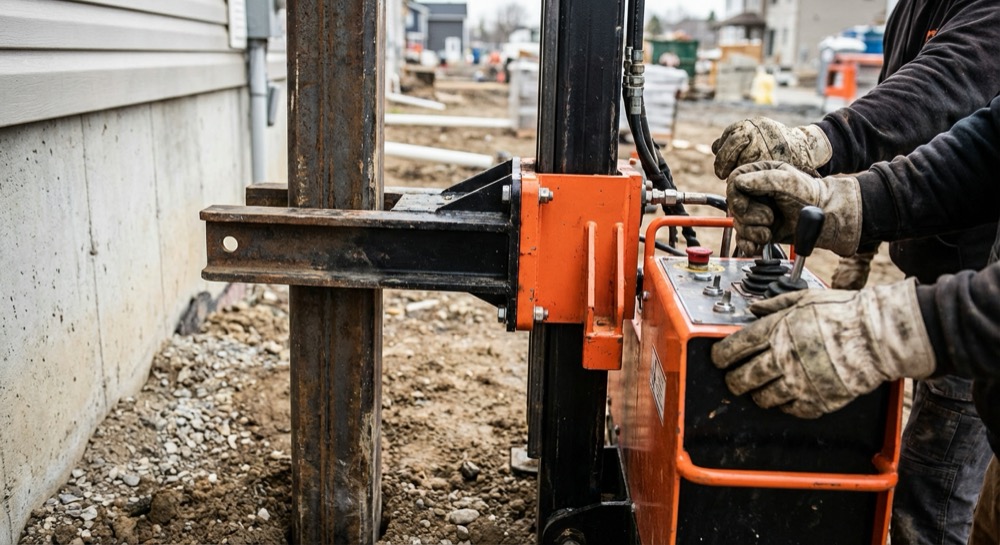
Steel push piers are the gold standard for permanent foundation stabilization. They are galvanized steel tubes driven deep into the ground -- sometimes 20 to 30 feet or more -- until they reach bedrock or a load-bearing stratum of stable soil. Once in place, hydraulic jacks transfer the weight of your home from unstable surface soil onto the piers, then slowly lift the foundation back toward its original elevation.
How the Installation Works
A contractor excavates small sections along your foundation footing, attaches steel brackets to the underside of the footing, and then uses a hydraulic ram to drive interlocking steel pipe sections through the bracket and into the earth. The process is methodical: each pier is driven until resistance readings confirm it has reached competent soil or rock. Afterward, the weight of the structure is transferred to the piers, and the excavation is backfilled.
Most residential jobs require 6 to 12 piers, spaced 5 to 8 feet apart along the affected wall. A typical single-family home with settling on one side might need $8,000 to $15,000 in total pier work. Larger homes or more severe settling can push that figure above $25,000.
Advantages
- Reaches load-bearing soil regardless of depth, making them effective in virtually any soil condition
- Can actively lift the foundation back toward its original position, not just stabilize it
- Minimal disruption to landscaping -- excavation points are small and localized
- Galvanized steel resists corrosion for decades
- Most manufacturers offer transferable lifetime warranties, which adds resale value
Drawbacks
- Highest per-pier cost of any underpinning method
- Requires heavy equipment (hydraulic ram), so access to tight areas can be challenging
- Relies on the weight of the structure to drive the pier -- very lightweight buildings may not generate enough force
Severe settling or sinking foundations on homes with enough structural weight to drive the piers. Ideal for older homes, heavy masonry structures, and any situation where the foundation has dropped 1 inch or more. The top choice when a permanent, warranty-backed solution is the priority.
Helical Piers Premium
Helical piers work on the same principle as steel push piers -- transferring your home's load to stable soil -- but they get there differently. Instead of being driven by the structure's weight, helical piers are mechanically screwed into the ground using a hydraulic torque motor. The shaft features one or more large helix plates (think of a giant screw) that pull the pier deep into the earth as they rotate.
How the Installation Works
After excavating to expose the footing, the crew positions a helical pier assembly and attaches it to a hydraulic drive head mounted on a skid steer or mini excavator. The motor rotates the pier, and the helical plates pull it into the ground -- much like screwing a bolt into wood. The operator monitors torque readings in real time. Once the torque reaches a pre-engineered threshold (which correlates to a specific load-bearing capacity), the pier is locked off and connected to the foundation bracket.
Because the installation does not rely on the building's weight, helical piers can be used on much lighter structures: porches, decks, additions, garages, and even new construction before the building is erected. This is their defining advantage over push piers.
Advantages
- Does not require structure weight to install -- works on light structures and new construction
- Torque-correlation testing gives precise, engineered load capacity data during installation
- Can be installed in tight-access areas where heavy driving equipment will not fit
- Vibration-free installation reduces risk of further damage to a compromised structure
- Removable and reusable in some applications (temporary shoring, construction support)
Drawbacks
- Helical plates can struggle to advance through dense gravel, cobble, or rock layers
- Slightly more complex engineering calculations required for multi-helix configurations
- Same high cost range as push piers
Lighter structures (porches, additions, manufactured homes), new construction pier installation, and any situation where the building does not have enough mass for push piers. Also preferred when vibration during installation is a concern, such as near sensitive masonry or historic structures.
Not sure which method you need?
Get a free inspection from a licensed structural contractor in your area. They will diagnose the problem and recommend the right repair.
Get Free QuotesConcrete Pressed Pilings Budget
Concrete pressed pilings are the most widely used foundation repair method in Texas and across much of the South. The concept is straightforward: pre-cast concrete cylinders (typically 6 inches in diameter and 12 inches long) are stacked and hydraulically pressed into the ground beneath your foundation. Once the stack meets resistance, a concrete cap is placed on top, and shims are used to raise the foundation.
How the Installation Works
The crew digs access holes next to the foundation, then uses a hydraulic press to push a column of stacked concrete cylinders into the soil. Each cylinder is placed one at a time, with the hydraulic press forcing the column deeper. Once the column encounters enough soil resistance (the press can no longer advance it), the crew inserts shims between the top of the column and the underside of the foundation beam to close the gap and lift the slab.
A typical Texas slab repair might involve 10 to 20 pilings at $200 to $500 each, putting total project costs in the $3,000 to $8,000 range. That makes it roughly one-third to one-half the cost of a steel pier job for the same foundation.
Advantages
- Significantly lower cost per unit than steel or helical piers
- Fast installation -- most residential jobs complete in one day
- No steel components means no risk of corrosion
- Well-suited to the clay soils common in Texas, Oklahoma, and the Gulf Coast
Drawbacks
- Cylinders are not driven to bedrock -- they rely on friction and soil compaction, which can shift over time
- In sandy, loose, or poorly compacted soils, pilings may settle again within 5 to 10 years
- No ability to actively lift the foundation as precisely as steel piers
- "Limited lifetime" warranties often have exclusions that reduce their practical value
Budget-conscious homeowners in clay-soil regions (Texas, Louisiana, Oklahoma) dealing with moderate settling. A good option when you need an affordable fix and the soil conditions are favorable, but not the best choice if the soil is sandy, has a high water table, or the settling is severe.
Slabjacking (Mudjacking) Temporary
Slabjacking -- also called mudjacking -- is a concrete lifting technique, not a structural repair in the traditional sense. It raises a sunken concrete slab by pumping a dense slurry (a mixture of cement, sand, and water) through strategic holes drilled in the slab. As the grout fills the void beneath the concrete, hydraulic pressure lifts the slab back toward level.
How the Installation Works
The crew drills 1- to 2-inch holes through the sunken slab at evenly spaced intervals. A pump forces the cement-sand slurry through the holes and into the void space beneath the concrete. The operator monitors the slab's elevation as the grout fills in, stopping once the slab reaches the target level. The drill holes are then patched with fresh concrete.
Slabjacking is most commonly used for driveways, sidewalks, garage floors, pool decks, and patio slabs. It is not a structural underpinning method. It does not stabilize a foundation that is actively settling due to soil failure -- it only fills the void that has already formed and lifts the slab.
Advantages
- Lowest cost for raising sunken flatwork (driveways, sidewalks, patios)
- Same-day results -- most jobs finish in 2 to 4 hours
- Slab can bear weight again within 24 to 48 hours
- Less invasive than tearing out and re-pouring concrete
Drawbacks
- The grout mixture is heavy (roughly 100 pounds per cubic foot), which adds load to already weak soil
- Not a permanent fix -- if the underlying soil continues to erode or compact, the slab will settle again
- Cannot address structural foundation settlement or wall cracking
- Drill holes remain visible, even after patching
- Shortest warranty period of any method
Raising sunken driveways, sidewalks, garage floors, and patio slabs where the underlying soil is still reasonably stable but a void has formed. A cost-effective short-term fix, but should not be used as a substitute for structural underpinning.
Polyurethane Foam Injection Modern
Polyurethane foam injection is the modern evolution of mudjacking. Instead of pumping heavy cement slurry, contractors inject expanding polyurethane foam through penny-sized holes in the slab. The foam expands to roughly 15 times its liquid volume, fills voids, compacts loose soil, and lifts the slab -- all within minutes.
How the Installation Works
Injection ports (roughly 5/8-inch diameter) are drilled through the slab at calculated intervals. A two-part polyurethane resin is pumped through the ports. The chemicals react and expand on contact, generating controlled pressure that lifts the concrete. The operator can adjust injection volume and location in real time to achieve precise leveling. Within 15 minutes of injection, the foam cures to 90% of its final strength.
The key advantage over traditional mudjacking is weight: polyurethane foam weighs approximately 2 to 4 pounds per cubic foot, compared to 100+ pounds for cement grout. That means it adds almost no additional load to the already compromised soil.
Advantages
- Extremely lightweight -- does not add meaningful load to weak soil
- Waterproof and non-biodegradable once cured
- Smaller injection holes than mudjacking (5/8 inch vs. 1-2 inches) -- nearly invisible after patching
- Reaches full strength in 15 minutes, so the slab is usable almost immediately
- Fills irregular voids and small cavities that grout cannot reach
Drawbacks
- 30% to 50% more expensive than traditional mudjacking for the same job
- Still not a structural underpinning solution -- it lifts slabs, it does not stabilize foundations
- Foam expansion can be difficult to control precisely, risking over-lift in some areas
- Environmental concerns: polyurethane is a petroleum-based product that does not biodegrade
The same applications as mudjacking (sunken flatwork, garage floors, pool decks) but with better long-term results and lighter weight. The go-to choice when the soil is particularly weak or when the slab cannot handle the added weight of cement grout. Also preferred when cosmetics matter, since the injection holes are smaller.
Every foundation problem is different.
A local inspection takes 30 to 60 minutes and costs nothing. Get matched with contractors who know your region's soil conditions.
Get Free QuotesEpoxy / Polyurethane Crack Injection Specialty
Crack injection is a targeted repair for non-structural and structural cracks in poured concrete walls, slabs, and foundation footings. Depending on the crack type and the goal of the repair, contractors use either epoxy resin (which bonds concrete together and restores structural strength) or polyurethane foam (which is flexible and primarily used to stop water infiltration).
How the Installation Works
Surface injection ports are adhered along the length of the crack at 6- to 12-inch intervals. The crack surface between the ports is sealed with an epoxy paste to prevent the injection material from leaking out. Using a low-pressure injection gun or cartridge system, the technician fills the crack from the lowest port upward, allowing the resin or foam to flow by gravity and pressure into the full depth and width of the crack.
For structural cracks (those indicating actual movement in the foundation), epoxy injection is the standard because it chemically bonds the two sides of the concrete back together. The cured epoxy is often stronger than the surrounding concrete itself. For water-leaking cracks where flexibility is more important than structural bonding, polyurethane foam injection is preferred because it expands to fill irregular voids and remains flexible enough to accommodate minor seasonal movement.
Advantages
- Precisely targets individual cracks without disturbing the surrounding structure
- Epoxy injection restores the original structural integrity of the concrete
- Permanently stops water infiltration through the crack
- Lowest cost option when the issue is limited to one or two cracks
- Non-invasive -- no excavation required
Drawbacks
- Only addresses the crack itself, not the underlying cause of the movement
- If the foundation continues to move, new cracks will form adjacent to the repaired one
- Epoxy is rigid -- if the crack is actively moving, epoxy may crack again (polyurethane is better for active cracks)
- Not effective on block walls, which require different sealing methods
Poured concrete foundation walls with hairline to moderate cracks (up to 1/2 inch wide), especially when water is leaking through the crack. Ideal as a standalone fix when the crack is caused by curing shrinkage or a one-time event, not ongoing settlement. If the foundation is still actively moving, crack injection should be paired with underpinning (piers).
Carbon Fiber Straps Specialty
Carbon fiber reinforcement is the go-to solution for bowing, leaning, or cracking basement walls that have not yet deflected beyond a critical threshold (typically 2 inches of inward bow). The straps are thin, incredibly strong sheets of carbon fiber fabric bonded directly to the interior surface of the wall with structural epoxy. Once cured, the carbon fiber prevents further inward movement by adding massive tensile strength to the concrete or block wall.
How the Installation Works
The wall surface is prepped by grinding the concrete smooth in vertical strips where the straps will be applied. Structural epoxy is troweled onto the wall surface, the carbon fiber fabric is pressed into the epoxy, and a second coat of epoxy is applied over the top. The straps run from the floor (anchored to the footing or sill plate) to the top of the wall (anchored to the rim joist or top plate). Typical spacing is 4 feet on center across the bowing section.
A standard basement wall repair might require 4 to 8 straps. At $500 to $1,500 per strap, total project costs typically land in the $3,000 to $10,000 range -- significantly less than the alternative, which is excavating outside the home and installing wall anchors or replacing the wall entirely.
Advantages
- Strongest reinforcement-to-weight ratio of any repair material -- carbon fiber is 10 times stronger than steel by weight
- Virtually invisible after installation -- straps are flat and can be painted or covered with drywall
- Zero excavation -- the entire repair is done from inside the basement
- Prevents further bowing without reducing interior space (unlike steel I-beams)
- Will not rust, rot, or degrade over time
Drawbacks
- Cannot push a wall back to plumb -- only stops further movement (walls that have bowed more than 2 inches may need wall anchors or reconstruction instead)
- Requires a clean, smooth bonding surface -- not effective on severely deteriorated or crumbling block walls
- If the wall continues to receive lateral pressure (from hydrostatic groundwater or expanding soil), straps alone may not be sufficient
Basement walls that are beginning to bow inward (less than 2 inches of deflection) or showing horizontal cracks from lateral soil pressure. The most cost-effective and least invasive option for stabilizing early-stage wall failure, especially when the homeowner wants to preserve finished basement space.
Side-by-Side Comparison
Use this table to compare all seven methods at a glance. For a detailed breakdown of each, scroll up to the individual method sections above.
| Method | Cost | Durability | Best Use Case | Warranty |
|---|---|---|---|---|
| Steel Push Piers | $1,000 - $3,000/pier | Permanent | Severe settling, heavy structures, bedrock access | Lifetime (transferable) |
| Helical Piers | $1,000 - $3,000/pier | Permanent | Light structures, new construction, vibration-sensitive | Lifetime (transferable) |
| Concrete Pilings | $200 - $500/piling | 5 - 15 years | Budget fix in clay soils, moderate settling | Limited lifetime |
| Slabjacking | $1,500 - $4,000/job | 3 - 8 years | Sunken driveways, sidewalks, patios | 1 - 3 years |
| Polyurethane Foam | $2,000 - $5,000/job | 5 - 10 years | Slab lifting on weak soil, smaller holes | 3 - 5 years |
| Crack Injection | $300 - $800/crack | 10 - 20+ years | Wall cracks, water seepage, poured concrete | 5 - 10 years |
| Carbon Fiber Straps | $500 - $1,500/strap | 25+ years | Bowing basement walls (<2" deflection) | Lifetime |
How to Match Your Problem to the Right Method
Foundation damage shows up in predictable patterns. Here is a quick decision framework based on the symptoms you are seeing:
Your foundation is sinking or settling unevenly
This is underpinning territory. If your budget allows and you want a permanent fix, steel push piers are the standard for heavy homes, and helical piers are the standard for lighter structures or new construction. If you are in Texas or another clay-soil market and need an affordable option, concrete pressed pilings are a reasonable middle ground -- just understand the tradeoff in longevity.
Your concrete slab, driveway, or sidewalk has sunk
This is a slab-lifting issue, not a structural foundation issue. Start with polyurethane foam injection if the soil is weak or you want minimal visible repair marks. Choose slabjacking if cost is the primary concern and the soil is reasonably stable.
You have cracks in your foundation wall
If the cracks are in a poured concrete wall and they are not growing, epoxy or polyurethane crack injection is the right call. Epoxy for structural restoration, polyurethane for water sealing. If the cracks are a symptom of ongoing settlement, injection alone is not enough -- you need to address the settlement first with piers, then repair the cracks.
Your basement wall is bowing inward
If the deflection is under 2 inches, carbon fiber straps are the most cost-effective and least disruptive solution. Beyond 2 inches, you are likely looking at wall anchors (steel plates driven into the soil outside and connected through the wall) or, in extreme cases, wall reconstruction.
Never commit to a repair method based on a single contractor's recommendation. Get at least two to three quotes, ask each contractor why they are recommending a specific method, and request documentation of the soil conditions. The right method should match your damage type, your soil, and your budget -- not just the contractor's preferred installation.
Ready to get this fixed?
Compare quotes from up to three vetted, licensed foundation repair contractors in your area. Free, no obligation.
Get Free Quotes